Commercial
Photography Tutorial and Camera Setup Infographic
Likes
23
Views
1.7K
 Orelon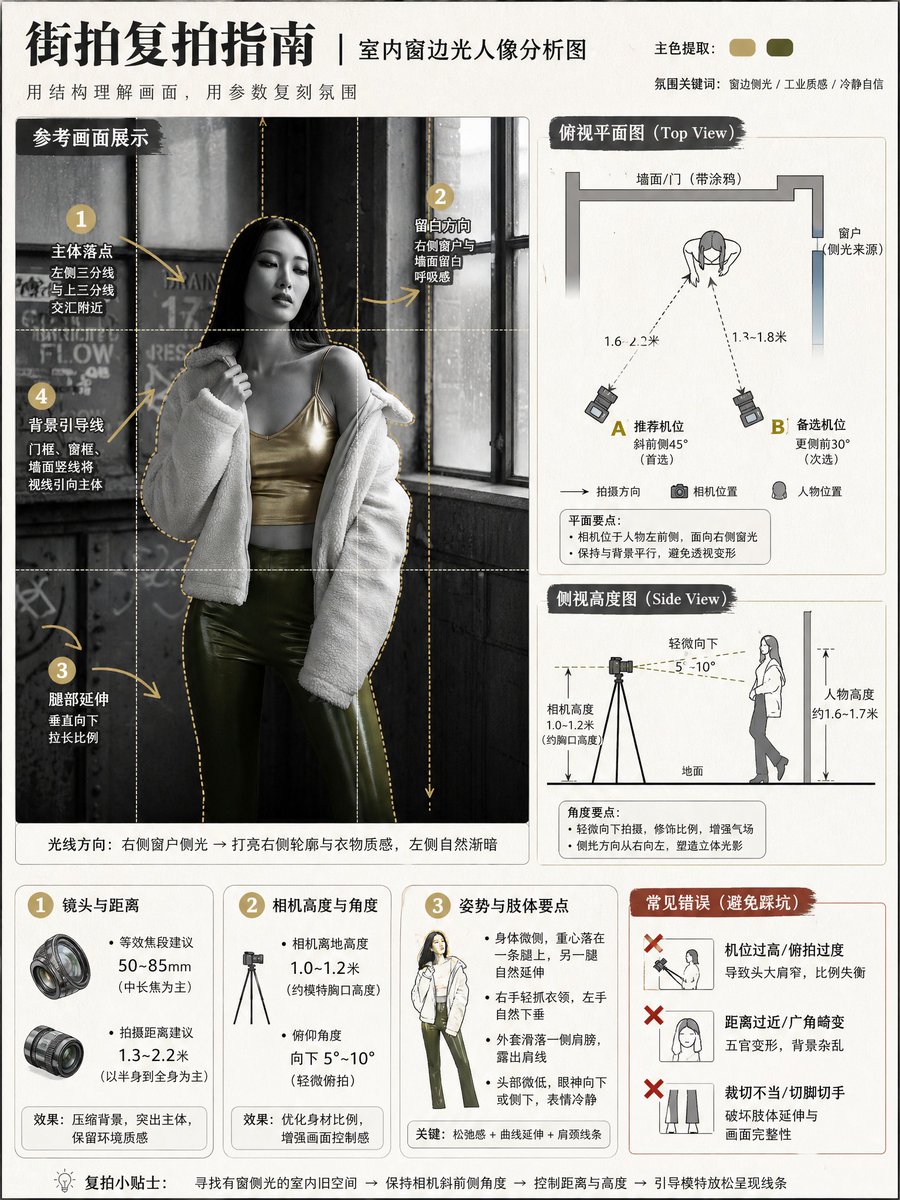
Commercial
Using [{argument name="reference image" default="Image 1 Reference"}] as the sole visual basis, generate a vertical 3:4 {argument name="teaching topic" default="street photography knowledge analysis chart"} (educational infographic poster). Goal: Use clear and interesting diagrams to explain "subject position, camera position, lens/distance, camera height, shooting angle, and composition points" for the purpose of teaching others how to recreate the shot. Overall style: Clean and high-end photography tutorial infographic + light scrapbook-style annotations; light off-white paper texture or light gray background; mainly black, white, and gray; automatically extract 1–2 colors from Image 1 as accents; sharp lines, high information density but not cluttered, unified alignment, and strong readability. Mandatory Rules: - Must preserve the following from Image 1: subject pose, relative position between subject and environment, main background structural lines, lighting direction, and spatial logic. - Do not change the pose or the scene; only provide an "analytical diagrammatic presentation." - Faces are not the focus: they can be lightly blurred/simplified, no realistic beautification, no emphasis on facial features. - Full Chinese; no English, no brand names, no watermarks, no UI interface elements. Fixed Layout (remains the same every time, does not change with Image 1): 1) Main Visual Area (upper half or large image on the left): Place the "Reference Scene Display" (lightly stylized/illustrated based on Image 1, but with recognizable scene and posture), overlaid with: rule-of-thirds grid, subject outline box, leading line prompts, vertical/horizontal line correction prompts; use numbered dots + hand-drawn arrows to mark key points (subject landing point, negative space direction, leg extension direction, background leading line source). 2) Diagram Area (two side-by-side images on the right or bottom half): - Top View: Use minimalist icons to draw wall/street/building boundaries (abstracted from Image 1), subject position (person icon), camera position (camera icon); must show shooting direction arrows, distance between subject and camera (dashed line + numerical range), recommended position points A/B (two alternative positions); camera orientation must match Image 1 (front/side/oblique, etc.). - Side View: Draw ground line, subject height示意, camera height示意, tilt angle sector; must show camera height range from ground (reasonably inferred from Image 1), lens tilt angle range (reasonably inferred from Image 1); low angle/eye level/high angle must be correct. 3) Parameter Card Area (three fixed rounded-corner cards at the bottom): - Card 1: Lens and Distance (give recommended equivalent focal length range + shooting distance range). - Card 2: Camera Height and Angle (give camera height range + tilt angle range). - Card 3: Pose and Body Points (summarize key points of the pose in Image 1 using short sentences). 4) Error Demonstration Area (fixed at the bottom right): 3 red-cross error prompts (automatically generated based on the most relevant issues in Image 1, short sentences), for example: don't use ultra-wide angle too close to the face, don't crop toes/fingers, don't use a camera position that's too high resulting in distorted proportions (adjust automatically based on Image 1's actual situation). Automatic Inference Requirements (to make it usable for any replacement of Image 1): - Automatically infer and write into the diagrams based on Image 1: camera orientation, camera height, shooting distance interval, equivalent focal length interval, subject landing point and cropping strategy, background leading line source. - All numerical values should be expressed as "ranges" (credible and reproducible), do not provide a single fixed number. Output Requirements: High definition, sharp lines, natural shadows, unified icons, neat layout, readable information; no garbled text, no logos, no watermarks, no excessive decoration. Negative Constraints: No watermarks, no logos, no English, no garbled text, no overly realistic faces, no exaggerated cartoon proportions, no limb deformities/extra fingers, no cluttered layouts, no low resolution, no heavy filters, no changes to the subject pose or scene relationship of Image 1.
This is a free AI prompt from the Orelon library. Thousands more image prompts here are free to copy and adapt.
Explore more image prompts


Ready to create
Start with this curated direction in Orelon, then shape it into your next visual.