
Focal Length Comparison Grid
A square technical comparison chart visualizing Blender versus GPT Images 2.5 focal-length behavior in a simple 3D room scene.
J’aime
0
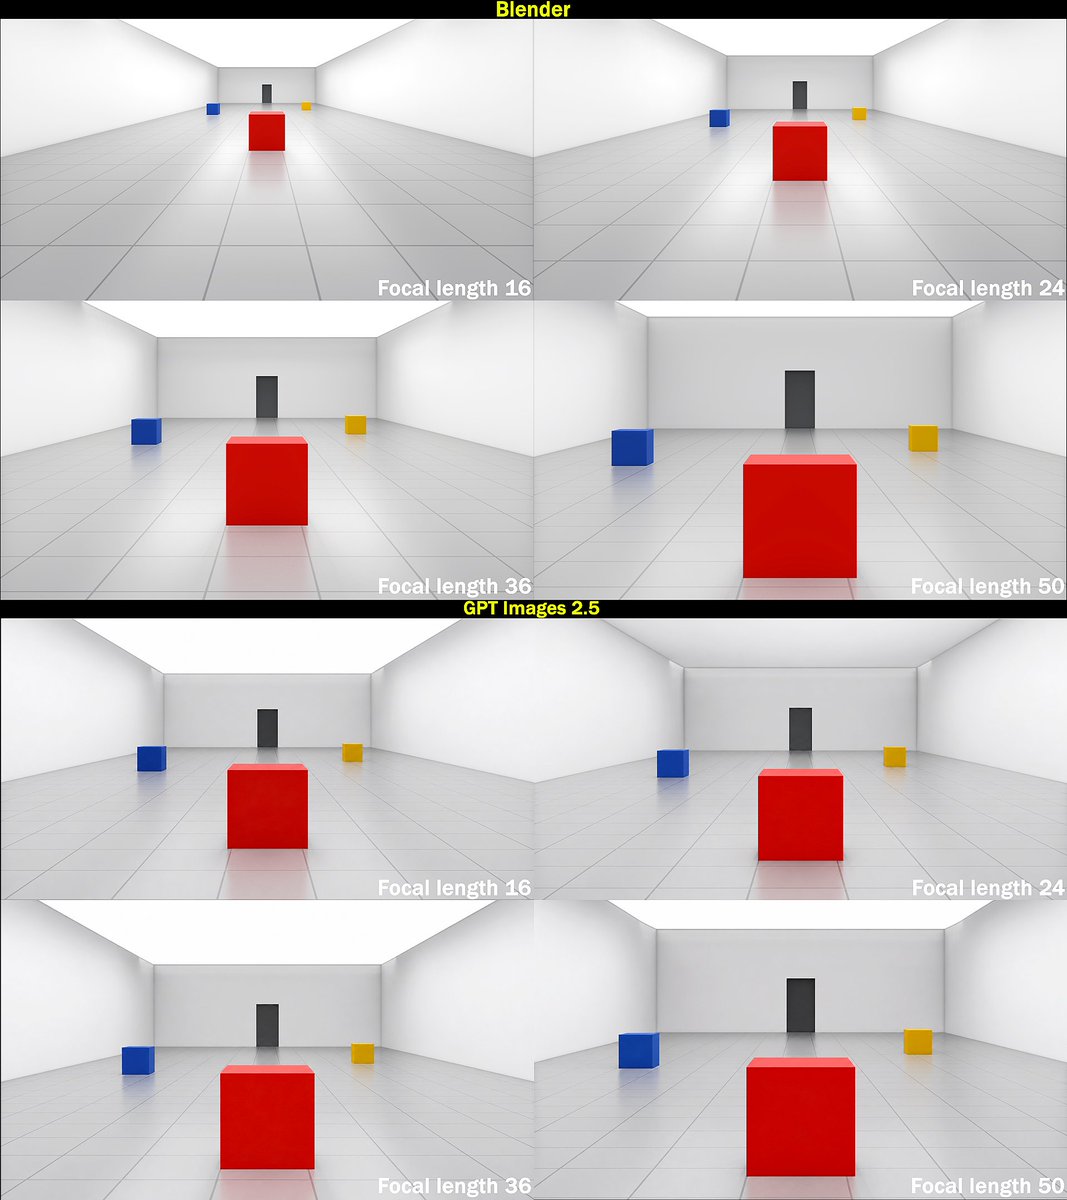
A square technical comparison chart visualizing Blender versus GPT Images 2.5 focal-length behavior in a simple 3D room scene.
Goal: Create a square technical comparison graphic showing how focal length changes perspective in a simple 3D room scene, comparing Blender renders against GPT Images 2.5 outputs. Canvas: Square image, approximately 1080 x 1080 px, with thin black outer border and two horizontal black title bars. The graphic contains exactly 8 rendered panels arranged as two stacked 2 x 2 grids. Layout: The upper half is labeled {argument name="top section label" default="Blender"} in bold yellow text centered on a black bar at the very top. The lower half is labeled {argument name="bottom section label" default="GPT Images 2.5"} in bold yellow text centered on a black divider bar between the two grids. Each section contains exactly 4 panels: top-left focal length 16, top-right focal length 24, bottom-left focal length 36, bottom-right focal length 50. In every panel, place the focal-length label in bold white text at the lower-right corner: "Focal length 16", "Focal length 24", "Focal length 36", and "Focal length 50". Scene repeated in all panels: A clean minimalist 3D test room with white walls, white ceiling, glossy pale gray tiled floor with visible grid lines, and a rear wall with a centered dark gray vertical door or rectangular panel. Place exactly 3 colored cubes in the scene: 1 large glossy {argument name="center cube color" default="red"} cube in the foreground center, 1 small glossy {argument name="left cube color" default="blue"} cube to the mid-left, and 1 small glossy {argument name="right cube color" default="yellow"} cube to the mid-right. The cubes cast subtle soft reflections on the polished floor. Use symmetrical perspective lines converging toward the back wall. Panel-specific camera behavior: In the Blender section, make the focal length progression visually accurate: 16 mm appears very wide-angle with the red cube smaller and farther away, strong room expansion and visible side walls; 24 mm slightly less wide with the red cube larger; 36 mm more zoomed with the red cube prominent; 50 mm most zoomed with the red cube very large and the side cubes closer to the edges. In the GPT Images 2.5 section, show the same scene and same four labels, but make the 16 mm and 24 mm panels less wide than expected, with object scale changing only modestly across focal lengths; the 16 mm panel should not shrink the objects as much as the Blender 16 mm panel. Visual style: Clean synthetic 3D render, soft global illumination, high-key white room, subtle shadows and reflections, crisp tiled floor, no people, no extra objects, no watermark. Maintain exact count: 2 labeled sections, 8 panels, 4 focal-length labels per section, and 3 cubes per panel.
Ceci est un prompt IA gratuit issu de la bibliothèque Orelon. Des milliers d’autres prompts image sont disponibles ici, à copier et adapter librement.
Explorer d’autres prompts image

Prêt à créer
Partez de cette direction sélectionnée dans Orelon, puis façonnez-la pour votre prochain visuel.